pyApex
Apex Project BIM Utils - pyRevit extension
Extension for pyRevit

Install guide / Инструкция по установке
EN
pyApex is an extension (or series of scripts) for Revit addin named pyRevit. So before using our scripts you should install pyRevit. Then just enable our extension in settings.
-
Download and install pyRevit from http://eirannejad.github.io/pyRevit/
-
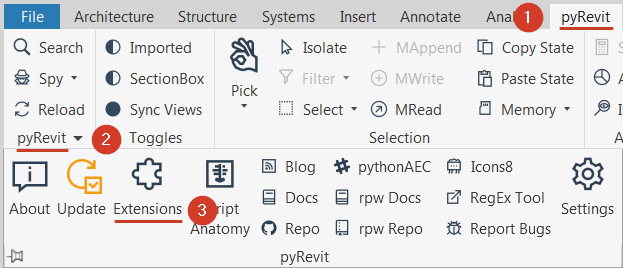
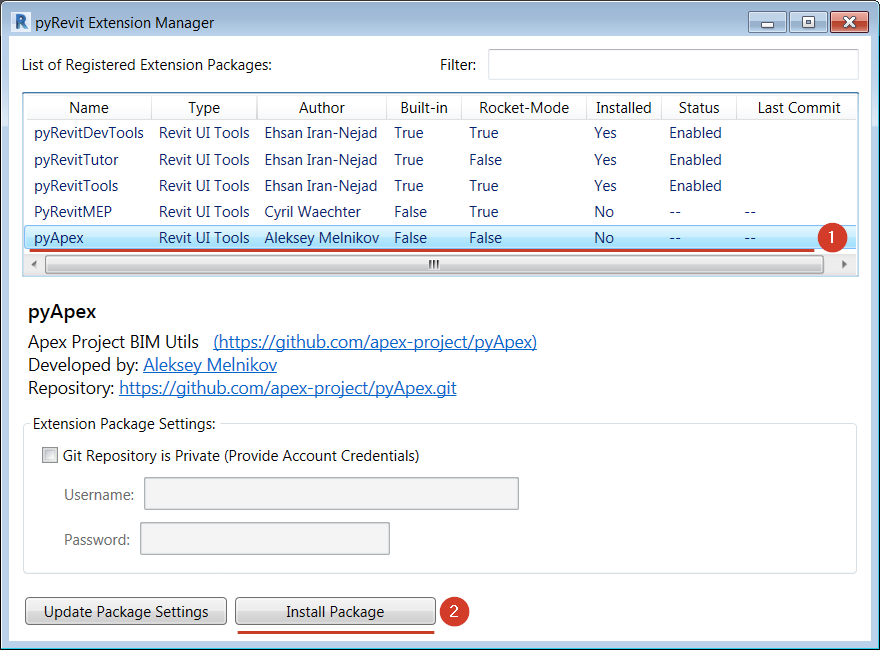
Open Revit. Then install extension from pyRevit tab - Extensions - select pyApex and click Install Package. Voila!
If there is not pyApex in extensions list or if you stucked with another problem during install go to Troubleshoting
RU
pyApex - это набор скриптов для Revit-плагина, который называется pyRevit. Поэтому для использования наших скриптов вам необходимо установить pyRevit, а затем в его настройках включить расширение pyApex
-
Скачайте и установите pyRevit http://eirannejad.github.io/pyRevit/ (на время установки необходимо подключение к интернету)
-
Запустите Revit, на вкладке pyRevit - в подгруппе pyRevit нажмите кнопку Extenstions. В открывшемся списке выберите в списке pyApex и нажмите Install Package. Готово!
Если в списке расширений нет pyApex, или в процессе установки возникли проблемы, обратитесь к разделу Устранение неполадок


EN
Troubleshooting
There is no pyApex in extensions list
There are two ways to be sure that pyApex is added to the list.
A. Be sure that you’re using latest version of pyRevit. It should contain a record about pyApex extension
B. You also can add this record manually.
Find your pyRevit installation (usually it located in C:\Users\%user%\AppData\Roaming\pyRevit\ or in C:\ProgramData\pyRevit). Open folder for necessary pyRevit version then again pyRevit and find extensions folder there. Full path should be similar to C:\Users\%user%\AppData\Roaming\pyRevit\pyRevit-v45\pyRevit\extensions
In extensions folder open extensions.json using Notepad. Then add next text in a file before square bracket ]. Be sure that curly brackets separated by comma },{.
,{
    "builtin": "False",
    "enable": "True",
    "type": "extension",
    "name": "pyApex",
    "rocket_mode_compatible": "True",
    "description": "Apex Project BIM Utils",
    "author": "Aleksey Melnikov",
    "author-url": "https://github.com/melnikovalex",
    "url": "https://github.com/apex-project/pyApex.git",
    "website": "https://github.com/apex-project/pyApex",
    "image": "",
    "dependencies": []
  }
Follow general guide to enable Extension.
RU
Устранение неполадок
В списке расширений не отображается pyApex
Есть два способа добавить pyApex в список расширений:
A. Убедитесть, что вы используете последнюю версию pyRevit. Она должна содержать запись о расширении pyApex.
B. Добавьте записть о pyApex вручную:
Найдите директорию, в которую установлен pyRevit (чаще всего это C:\Users\%user%\AppData\Roaming\pyRevit\ или C:\ProgramData\pyRevit). Откройте папку необходимой версии pyRevit, затем снова pyRevit и папку extensions. Полный путь будет похож на C:\Users\%user%\AppData\Roaming\pyRevit\pyRevit-v45\pyRevit\extensions
В папке extensions с помощью Блокнота откройте extensions.json. Добавьте следующий текст в данный файл перед квадратной скобкой ]. Убедитесь что между фигурными скобками есть запятая },{.
,{
    "builtin": "False",
    "enable": "True",
    "type": "extension",
    "name": "pyApex",
    "rocket_mode_compatible": "True",
    "description": "Apex Project BIM Utils",
    "author": "Aleksey Melnikov",
    "author-url": "https://github.com/melnikovalex",
    "url": "https://github.com/apex-project/pyApex.git",
    "website": "https://github.com/apex-project/pyApex",
    "image": "",
    "dependencies": []
  }
Повторите действия включите расширение pyApex, в соотвествии с основной инструкцией